How to Setup Kobo Desktop and New eReader using Wine on Linux
Summary
This tutorial describes how to install the Kobo Desktop software using
wine and setup your new Kobo eReader, Kobo Touch, Kobo Mini, Kobo Glo,
or Kobo Aura HD.
These steps were documented using Kubuntu 12.04 which uses the K
Desktop Environment (KDE). Tips are provided on how to use these
instructions with other desktop environments.
|
TIP: Update April 27, 2015 - Work around to setup
Kobo eReader without Kobo Desktop or Kobo Account
Congratulations! You should now be able to either side-load books onto your Kobo eReader (copy files directly to mounted eReader), or load books using Adobe Digital Editions. :-) See also:
|
|
WARNING: Update September 8, 2014 - Recent Kobo
Destop Software Fails to Install under Wine |
|
NOTE: Update April 3, 2014 - Firmware Updates Fail with
Recent Kobo Desktop Software |
Contents
- Install Wine and Setup Kobo Drive Letter
- Connect Kobo eReader to Computer
- Download KoboSetup.exe File
- Install Kobo Desktop
- Synchonize Kobo Desktop with eReader
- Disconnect Kobo eReader
- Future Kobo eReader Tutorial
Install Wine and Setup Kobo Drive Letter
-
Install wine and add a permanent floppy drive letter mapping.
See How to Setup Wine to Use Windows Applications with Kobo eReader on Linux.
Connect Kobo eReader to Computer
In the following steps we will connect your new Kobo eReader to your
computer using the supplied USB cable. We will also ensure that the
device is mounted on your computer so that it can be used with the
Kobo Desktop application.
Note that a powered off Kobo eReader that is new or in the Factory
Reset state will look like the following picture:

-
Plug your Kobo eReader into your computer using the USB cable.
Your eReader should start powering up with the following display on the screen:

-
Select the language to use with your eReader. For example,
English.

NOTE: No Language Selection Screen?
If instead you see the following screen, then select CONNECT and skip ahead to step 6.

-
Select COMPUTER SETUP.

-
Your Kobo eReader is now connected and charging.

-
Mount the Kobo eReader.
If using KDE an available devices list will pop up in the lower right-hand corner of the screen. Select the Open with File Manager option to mount the Kobo eReader.

NOTE: Mounting eReader with File Manager
If you are not using KDE, or you missed the above available devices list, then you can open a file manager and click on the Kobo eReader entry to mount the Kobo eReader.
In KDE, select the menu option: K --> System --> Dolphin (File Manager) to open a file manager.
In other desktop environments, a file manager should be listed in the menu entries under names such as Nautilus, or PCManFM. Open this file manager and click on the Kobo eReader entry to mount the Kobo eReader.
Download KoboSetup.exe File
-
Download Kobo Desktop setup file for Windows.
NOTE: Update Nov. 5, 2015 - Unable to download Kobo Desktop from Linux?
The Kobo Desktop download no longer works from Firefox in Linux. A work around is to use Firefox under Wine. Thanks go to Grazie Giovanni for reporting this issue and work around.
Instructions on how to install Firefox in Wine can be found in the article Streaming CTV Shows not working with Firefox on Linux.
Open a web browser, visit the kobosetup.com web site, and click on the Download Kobo Desktop for Windows link.

-
Save the KoboSetup.exe file.

Note the location where the file is saved. In Kubuntu, the file is saved into the ~/Downloads directory by default.
Install Kobo Desktop
-
Open a terminal window.
In KDE, select the menu option: K --> System --> Konsole (Terminal).
TIP: Opening a terminal in other desktop environments
You can often open a terminal window using the following steps:
a) Press Alt+F2 to open a run command prompt
b) Enter "xterm" without the quotes
-
Start the Kobo Desktop install.
Start the install with the following command:
wine ~/Downloads/KoboSetup.exeA few different windows will be displayed while the Kobo Desktop software is installed.
-
Click the Finish button to run the Kobo Desktop.
Note that the Kobo Desktop has been installed at this stage, but we have not yet specified a Kobo account to use with the Kobo eReader. As far as I can tell, a Kobo account is required to finish setting up and using the eReader.

Synchonize Kobo Desktop with eReader
-
Click the OK button to acknowledge the Kobo Desktop version
installed.

-
Click the SIGN IN OR CREATE AN ACCOUNT icon.

-
If you already have a Kobo account, proceed to sign in with your
email address and password and skip ahead to step 16.
If you do not have a Kobo account, click on New? Sign up here

-
Enter your email address, a password (twice), select if you wish
email from Kobo, and click the CONTINUE button.
Note that you might need to scroll down to view the CONTINUE button.

-
After successfully signing up, the Kobo Desktop will begin syncing
with the Kobo web site.

-
With a new Kobo eReader, or eReader that as been Factory
Reset, click the SET UP NOW button.
If you do not see the following window then skip ahead to step 21.

-
Click the GET STARTED button.

-
If your Kobo eReader does not contain the most recent update then
an eReader upgrade will be downloaded.

NOTE: Please connect to the Internet displayed?
If the download fails, click the TRY AGAIN button.
Note that when I created this document it took me 3 tries for the update to successfully download.

-
Sign into your newly created Kobo account using the email address
and password you used earlier..

-
After signing in, your eReader should begin configuring and syncing.

-
After configuring and syncing, your eReader should be successfully
set up. Click CONTINUE.

Disconnect Kobo eReader
-
Close the Kobo Desktop.
NOTE: The Eject button on the Kobo Desktop does not work
Note that there is an EJECT button on the EREADER tab.

If you click on the EJECT button then the eject will fail.

For this reason we close the Kobo Desktop and in the next step we will manually unmount the Kobo eReader.
-
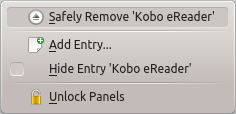
Safely unmount your Kobo eReader.
In KDE in an open Dolphin File Manager, right-click on the Kobo eReader entry and select the option to Safely Remove 'Kobo eReader'.
TIP: Another way to safely unmount your Kobo eReader
If you are unsure how to unmount your Kobo eReader from a file manager, then shutdown your computer. This will ensure that the Kobo eReader is safely unmounted.
-
Unplug the USB cable from your Kobo eReader.
If your Kobo eReader received a software update then the following screen will be displayed:

-
After updates have been applied, your Kobo eReader will power
up.

-
At the QUICK TOUR screen, click on the right arrow to
navigate through each page and learn about your Kobo eReader.

-
When you get to one of the following two screens your Kobo eReader
has completed the setup stage.


-
Your Kobo eReader is now ready to load ebooks onto it. :-)
To load books onto your Kobo eReader you will need to either connect it to your computer using the USB cable, or connect to the Internet using WiFi wireless networking.
You can load books using methods such as:
- Download a book from a web site, such as Project Gutenberg, and copy the .epub file to your Kobo eReader using a file manager.
- Login to your Kobo Books account, add a book to your library, and use the Kobo Desktop to sync the book to your kobo eReader.
- Download a book from your local library, and load it onto your Kobo eReader using Adobe Digital Editions.
|
NOTE: No Menu Entry for Kobo Desktop? |
|
TIP: Using Software with your Kobo eReader |
Future Kobo eReader Tutorial
For anyone seeking more in-depth instructions, in a future tutorial I plan to cover the following topic: