Identifying and Replacing a Failing RAID Drive
Summary
This tutorial describes how to identify a failing RAID drive in a
MythTV PVR and outlines the steps to replace the failing drive with no
loss of data or recordings.
This tutorial is the last in a mini series that started
with Why Consider RAID for
PVR Recordings and Solid State Drive for Mythbuntu Operating
System, went on to separate the OS from the recordings
with Migrating
Existing MythTV 0.24 on HDD to MythTV 0.25 on SSD, and placed the
recordings in a RAID
with Setting Up RAID and
Migrating MythTV Recordings.
The original series of articles that outline the path of creating a
custom-built PVR can be found at the following links:
- Cutting the cord on cable TV
- Selecting hardware for a MythTV PVR
- Installing Mythbuntu 12.04.2 with MythTV 0.25
- Configuring MythTV automatic wakeup and shutdown
Contents
- Identifying a MythTV PVR Failing RAID Drive
- Replacing a RAID Drive
- Failed RAID Replacement Complete
- References
Identifying a MythTV PVR Failing RAID Drive
Previously, we setup
RAID and monitoring with two drives containing our MythTV
recordings. At that time we assumed that there would be no noticeable
indications of RAID drive failure other than an on-screen warning that
the RAID had dropped into a degraded state. Much to my surprise we
learned that a failing RAID drive can adversely impact TV show
recordings and viewing before outright failure of the drive.
Our first indication of a problem occurred on Feb 10, 2014 while
enjoying a previously recorded show. While watching the program, the
screen froze and sound stopped for several seconds, and then proceeded
as if nothing had happened. Since we had seen this occur before when
under heavy load such as simultaneously recording four HDTV shows,
commercial flagging these shows, and watching a prerecorded show, we
assumed that this must again be the case.
However a few days later while viewing another prerecorded show, the
screen froze and sound stopped again for a few seconds before
resuming. This time we checked the MythTV PVR activity and only one
other show was being simultaneously recorded. This was new behaviour
and we noted that further investigation was needed.
The next day (Feb 14) I opened a terminal window, ran the dmesg
command, and scanned the output for any unusual disk device messages.
However, I found no reports of problems with any of the three disk
devices (/dev/sda, /dev/sdb, /dev/sdc).
Next I checked the status of the RAID with the following command:
cat /proc/mdstat
---------- begin output ----------
Personalities : [linear] [multipath] [raid0] [raid1] [raid6] [raid5] [raid4] [raid10]
md0 : active raid1 sdc1[1] sdb1[2]
      976629568 blocks super 1.2 [2/2] [UU]

unused devices: <none>
---------- end output ----------
This output looked normal to me and contained no indications of
problems. As far as I could tell, the RAID was functioning
properly.
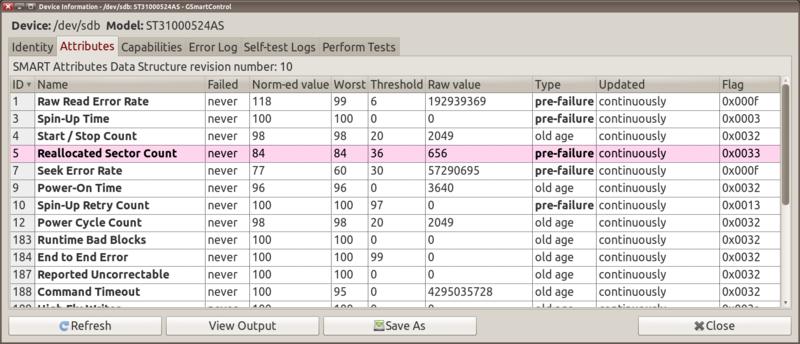
Lastly, since these newer disk devices contain smart monitoring, I
decided to check on these logs. I started Applications -> System
-> GSmartControl and one by one double-clicked on each drive. My
Solid State Drive (SSD - /dev/sda) was good. However, only one of my
Hard Disk Drives (HDD - sdc) was good. The other one (HDD - sdb) was
indicating in the Attributes tab a Reallocated Sector Count of
656. In the Type column I noticed the
word pre-failure. Some other columns were also indicating the
drive was in pre-failure mode. These were the first log
indications that the disk drive was failing.

Because no recordings had been adversely impacted, and since we only
experienced the occasional screen freeze while watching shows, we
decided to use this situation as a learning experience. We would wait
and see how much longer the drive would last.
Over the next 10 days, we used our PVR as usual. We continued to
experience the occasional screen freeze mostly when at least one other
show was being recorded. However on Feb 20th, we discovered that some
TV shows recorded the previous night did not capture the entire show.
At this point the RAID was still functioning, however the delay in
writing files seems to have cut short the recording of TV shows. My
guess is that the tuner card buffer might have been overrun before the
recording could be written to disk, and as a result the show recording
stopped.
Replacing a RAID Drive
Following are the steps I used to replace a failing drive in our RAID level 1 mirror. Please note that these steps can be used whether the RAID is running in a normal, or in a degraded state.
|
TIP: Perform Steps When Not Recording Shows |
- Determine which disk device needs replacing.
In our situation, the RAID was still functioning and was not in a degraded state. To determine which disk device needed replacement, I checked the smart monitoring logs using GSmartControl.
Start Applications -> System -> GSmartControl.
For each drive, double-click on the drive icon and check the Attributes tab for failure problems. In this case, the tab was highlighted in red letters. When I hovered over the Reallocated Sector Count a window popped up announcing that a non-zero value indicates a disk surface failure.

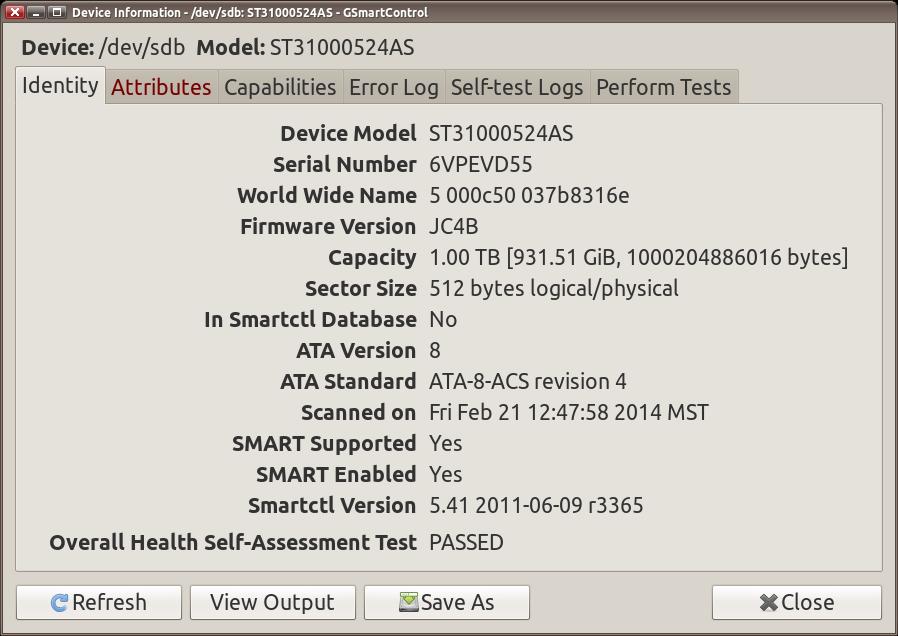
In order to identify the physical disk drive, click on the Identity tab and make note of the device and serial number (S/N).

In our situation, the failing disk drive device was /dev/sdb and the Serial Number was 6VPEVD55. We will need this information later to correctly identify which physical disk drive to replace. - Ensure the bad drive is marked as failed in the
RAID.
Check the RAID with the cat /proc/mdstat command and scan the devices and partitions to see if "(F)" is indicated beside any device or partition.
$ cat /proc/mdstat
Personalities : [linear] [multipath] [raid0] [raid1] [raid6] [raid5] [raid4] [raid10]
md0 : active raid1 sdc1[1] sdb1[2]
      976629568 blocks super 1.2 [2/2] [UU]

unused devices: <none>
In this situation, neither sdb1 nor sdc1 is shown as (F)ailed so next we use the mdadm command to mark sdb1 as failed. Note that sdb1 is a partition on our failing disk device sdb.
$ sudo mdadm --manage /dev/md0 --fail /dev/sdb1
[sudo] password for pvr:
mdadm: set /dev/sdb1 faulty in /dev/md0
$ cat /proc/mdstat
Personalities : [linear] [multipath] [raid0] [raid1] [raid6] [raid5] [raid4] [raid10]
md0 : active raid1 sdc1[1] sdb1[2](F)
      976629568 blocks super 1.2 [2/1] [_U]

unused devices: <none>
Notice the (F) beside sdb1 which indicates failure.
NOTE: Ensure all partitions marked fail in RAID for failing disk
If more than one partition from the failing disk is included in a RAID, then be sure to perform similar steps for each of these partitions to fail the partition in the RAID. Further, remember to repeat the tutorial steps to remove, and later add back any partitions identified on the failing RAID disk. - Remove the failed device or partition(s) from the
RAID configuration.
Use the mdadm command to removed the failed device or partition(s).
$ sudo mdadm --manage /dev/md0 --remove /dev/sdb1
mdadm: hot removed /dev/sdb1 from /dev/md0
$ cat /proc/mdstat
Personalities : [linear] [multipath] [raid0] [raid1] [raid6] [raid5] [raid4] [raid10]
md0 : active raid1 sdc1[1]
      976629568 blocks super 1.2 [2/1] [_U]

unused devices: <none>
Notice in the above that sdb1 has been removed, and that there are no other sdb partitions in any RAID entries. - Power off and physically replace disk drive.
Shutdown and power off MythTV and disconnect the power cord from the PVR.
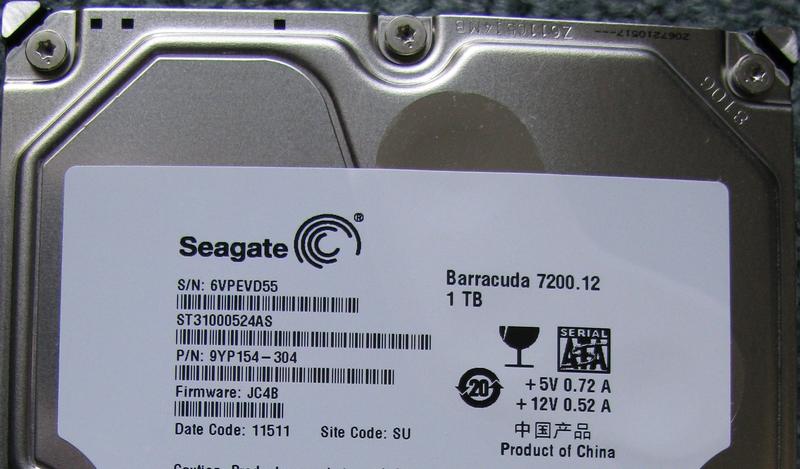
Remove the disk device that matches the failing drive serial number noted earlier.

In this example we remove the hard disk drive with serial number S/N: 6VPEVD55. - Install new replacement hard disk device.
Note that the replacement hard disk device must have the same sector size, and contain at least as much storage space in order to work with the RAID. - Re-connect the power cord and boot up the PVR.
- Partition the replacement hard drive
Create partition(s) that are exactly the same size as the partition in the RAID. In this example the steps are as follows:
Run GParted from a terminal window using the following command:
sudo gparted
- Select the /dev/sdb device using the upper right-hand-side drop-down list.
- Use Device -> Create Partition Table to write a new empty msdos (MBR) partition table.
- Select the unallocated space.
- Use Partition -> New to create one new
unformatted primary partition spanning the drive.
NOTE: On my 1 TB drive this is 931.51 GB or 953,869 MiB. - Use Edit -> Apply All Operations to apply this operation.
- Close the Applying pending operations window.
- Use Partition -> Manage Flags to set
"raid" flag.
- Exit gparted.
- Add the replacement drive to the RAID.
Use the mdadm command to add the replacement drive to the RAID.
$ sudo mdadm --manage /dev/md0 --add /dev/sdb1
[sudo] password for pvr:
mdadm: added /dev/sdb1
You can check the progress of rebuilding the RAID with the cat /proc/mdstat command.
$ cat /proc/mdstat Personalities : [linear] [multipath] [raid0] [raid1] [raid6] [raid5] [raid4] [raid10] md0 : active raid1 sdb1[2] sdc1[1] 976629568 blocks super 1.2 [2/1] [_U] [>....................] recovery = 0.0% (327872/976629568) finish=148.8min speed=109290K/sec unused devices: <none>NOTE: Monitoring RAID Build Progress
When adding the second 1 TB drive in the RAID level 1 mirror, it took 3 hours to mirror the RAID from one drive to another.
You can use the watch command to frequently check the progress of building the RAID:
watch -n 60 cat /proc/mdstat
Use Ctrl+C to stop watching the progress.
When the raid is finished rebuilding, the output from cat /proc/mdstat should look similar to the following:
$ cat /proc/mdstat
Personalities : [linear] [multipath] [raid0] [raid1] [raid6] [raid5] [raid4] [raid10]
md0 : active raid1 sdb1[2] sdc1[1]
      976629568 blocks super 1.2 [2/2] [UU]

unused devices: <none>
Failed RAID Replacement Complete
Congratulations, you have now completed the replacement of the failed
RAID hard drive. Your PVR should once again be 100% operational.
Regarding hard drive longevity, the first indication of a problem
occurred with this disk device after 995 days of operation. No TV
show recordings were adversely impacted until the device had been in
operation 1005 days. Since we've had many hard drives last longer
than this, and some shorter, all we can say is that we are glad that
we separated our Mythbuntu OS from the MythTV recordings, and that we
placed the MythTV recordings on a RAID. :-)
References
While replacing a failing RAID drive, I found the following reference useful:

